
Materials used
Blonde Moments
Pearl pigments - Sugar Floss, Festive Copper, Spring Orange
Stamps - A Little Bit of This, Just Plain Swirly
Papers - Spring Fling
Clear embossing powder
Spritzer bottle
Ribbon
Ranger
Spiced Marmalade Distress ink pad
Raspberry Adirondack ink pad
Carnation Archival ink pad
Black perfect medium Pad
Heat resistant mat
White Opaque Gel pen
Star Dust Stickles
Cut n Dry Foam
Method for Background
Step 1 Apply Spiced Marmalade Distress ink to a piece of 7 1/2 x 7 in white card using a piece of cut n Dry foam in a circular motion.

Step 2. Apply Raspberry ink using the same method. Make sure there are no white spaces left by blending over the orange ink. If you require a darker background go over the orange and raspberry inks again.

Step 3. Spritz a puddle of water into a cupped hand

Step 4. Flick the water onto the inked background.

Step 5. Leave the water to penetrate the ink, for approx 20 - 30 secs, and then lift off with a paper towel.

Step 6. Cut the background into 6 pieces measuring 2 1/2 x 3 1/2 in.

To make Atc's / Cards.
Step 1. Ink flower stamp ( A Little Bit of This) with Carnation Archival ink and stamp all over a piece of background.
 Step 2. Faux stitch around the edge with the Opaque white Pen.
Step 3. Add accents to background with Opaque White Pen.

Step 4. ink the edges with Raspberry Adirondack ink.

Step 5. Ink the flower stamp ( Just Plain Swirly) with black perfect Medium, and stamp onto white card. Sprinkle with clear embossing powder.

Step 6. Heat emboss.

Step 7. Dip a wet paintbrush into Blonde Moments Festive Copper Pearl Pigments.

Step 8. Mix into a creamy paint on heat resistant mat.

Step 9. Paint in flower image, mixing other Pearl Pigments as you go.

Step 10. Cut out image leaving a small border.
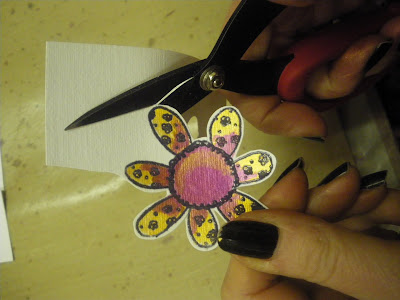
Step 11. Mount onto orange card and cut out leaving a small border.

Step 12. Mount onto Atc using foam tape.

Step 13. Add decorative accents with Star Dust Stickles. Leave to dry.
.JPG)
To make card.
Step 1. Ink word stamp (Just Plain Swirly) with Carnation Archival ink and stamp onto card 3 times.

Step 2. Tear a piece of Blonde Moments Spring Fling orange paper and ink torn edge with raspberry ink.

Step 3. Add torn paper to card. add ribbon over the paper and tie in a double knot. Ink all edges of card with raspberry ink.

Step 4. Add Atc to card.

Here is the same card in two other colourways.
Raspberry and Teal.

Teal and Orange

Easy as pie, Yeah?? So for the next 5 days we will use the basic background to make 6 more atc's/ cards. Enjoy
6 comments:
These are fab Dy my fav background technique after coming to your atc class last year!
I can't believe there's only 1 comment! It must be because everyone's busy being creative after being inspired by your wonderful instructions! Which is just what I'm going to do now...Thanks Dyan.
This is beautiful work.
Dyan your work is inspirational thank you so much for the fantastic tutorials woohoo i won some fab stash from your shop in a magazine,love love love it and you have inspired me to have a go at the techniques.
big
hugs
Tracy
xxx
These are brilliant with a capital 'B' - Love it - of to try it out now... thanks for all the inspiration last weekend in MacDuff...x
Love it - in fact am of to try it oot right now - thanks for all the fabby inspiration we had last weekend in MacDuff...x
Post a Comment