
You will need one of the ready prepared backgrounds we made earlier. If you missed it you will find it here.
Materials
Blonde Moments
Stamps - Gifts Galore, Johannas Direction
Papers - Spring Fling
Spritzer bottle
Ribbon
Ranger
Tim Holtz Idea-ology
Method
Step 1. Take one prepared background. Ink the quote stamp(Gifts Galore) with carnation Archival ink and stamp onto the background.

Step 2. Faux stitch around the edge with the Opaque white pen.

Step 3. Add accents to the quote with the white pen.
Step 3. Add accents to the quote with the white pen.

Step 4. Stamp the stripy arrow (Johannas Direction) onto white card with Black Perfect Medium. Sprinkle with Blonde Moments clear embossing powder.

Step 5. Heat emboss the image.

Step 6. Dip a wet paintbrush into the Blonde Moments Spring Orange Pearl Pigment.

Step 7. Mix on the heat resistant mat into a creamy paint.

Step 8. Paint in the image. Repeat with the other colours of pearl pigments.
 Step 9. Cut out the image leaving a small border.
Step 9. Cut out the image leaving a small border.Step 10. Mount onto pink card , cut out leaving a small border.

Step 11. Mount onto the background with foam tape.
 To make the card
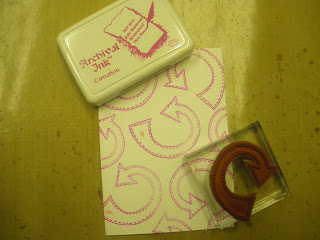
Step 1. Ink the curvy arrow with Carnation Archival Ink and stamp all over a C6 card.
Step 2. Tear a strip of Blonde Moments Spring Fling orange paper and ink both torn edges with Raspberry Adirondack ink.

Step 3. Add to card and ink all edges with Raspberry ink.

Step 4. Add Atc to card.

Step 5. Thread a long brad through a game spinner and a sprocket gear. Make a hole through the bottom of the Atc and thread the embellishments through, so that the arrow spins.


Here we have 2 other colourways.
Raspberry and Teal

Teal and Orange
 So there we go , Day 4 tomorrow.
1 comment:
Youve got me intrigued can I bear to be parted from the PC now!!!!!!
Post a Comment