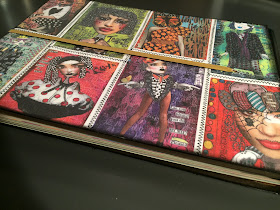
Thought you might like to see what we've been getting up to with our Sticky back canvas's.
It was so much fun that we thought we would do a step by step for you.
Materials;
- Dylusions Journal Cover - Here I've used the New Large Flip Journal
- Dylusions Adhesive Canvas Sheets - Here I've used the New Collection Images #2
- Dylusions Black Marble Piant
- Tim Holtz - Blending Tool
- Double sided tape & Glue Stick
- Tape
- Sewing Machine / or You can hand stitch
- Scalpel & cutting Matt
First lay out the canvas sheets in the order You like, I have done them off centre. Once you have decided where you would like them we can start sticking.
I have used Orange Washi Tape to show you how I have attached the canvas sheets together, firstly start by attaching each pair together with a piece of tape.
Next I taped the 4 canvas sheets together.
You can see here how I have attached the tape like little tabs to attach the next canvas sheets on.
and continue until they are all stuck together.
Here's what the front will look like once they are all attached
And here is what the back looks like! Don't worry if it looks messy, this will be stuck to the front of your journal cover. I have attached them together to make it easier for sewing on the sewing machine.
Next I have used a zigzag stitch to stitch the canvas sheets together, I found it easier to stitch the longer sides first.
Once I had stitched the longer sides I then went in & stitched the 4 smaller sections together.
Here is the front all stitched together
Here is the back of the canvas sheets all stitched together. As You can see I have stitched straight over the orange Washi tape. Remember this side will be stuck down to the journal.
Before I attached the canvas sheets to the journal cover I painted the spine & inside using Dylusions Black Marble Paint & blending tool.
Next I have stuck the Canvas sheets to the journal cover using double sided tape & glue stick.
Next I trimmed around the canvas sheets using a scalpel & cutting matt to get a neat finish.
Then I shaded around the journal cover using Black Marble paint & blending tool.
To fit the elastic around the canvas sheets perfectly I cut a slit through the canvas and stuck it around the elastic... If you look very very closely you can just see the cut.
And here is the finished piece, I have used the same canvas sheets for the front & back cover but I have changed the positions of the canvases.
Here is a flip Journal decorated exactly the same however the canvas sheets are portrait instead of horizontal
As you can see on this one we have stitched around the edges too
I hope you like them,
Love Jay


Amazing! Love that idea 💕💕
ReplyDeleteLike them.... we love them xxx
ReplyDeleteLove them!
ReplyDeleteBeautifull, LOVE it !! 💕💕💕
ReplyDeleteThis looks really cool!
ReplyDeleteI love love love them! SO cool ❤
ReplyDeleteI love how it turned out but aren't you worried that the sticky on the back of the canvas will gum up your machine? I try to avoid any double sided sticky tape while stitching for this reason. Thank you so much for sharing xxA
ReplyDeletegorgeous work !
ReplyDeleteThis is gorgeous! WHat a great idea...
ReplyDeleteAbsolutely FABULOUS! Also just wanted to tell you that I took the journal class with you last Thursday night at Whim So Doodle and was so INSPIRED, that I went home and created the most beautiful cover using your paint techniques. Thank You! I am in LOVE with your paints...and you!
ReplyDeleteWhat a fabulous idea.
ReplyDeleteWhat a MAH-velous idea !! I love them all!
ReplyDeleteGoing to give it a try!
ReplyDeleteThis comment has been removed by a blog administrator.
ReplyDeleteThis comment has been removed by a blog administrator.
ReplyDelete