Pages

Saturday, February 11, 2017

Dylusions Flip Journal - Canvas Cover Step-by-Step

Thought you might like to see what we've been getting up to with our Sticky back canvas's.
It was so much fun that we thought we would do a step by step for you.


Materials;
- Dylusions Journal Cover - Here I've used the New Large Flip Journal
- Dylusions Adhesive Canvas Sheets - Here I've used the New Collection Images #2
- Dylusions Black Marble Piant
- Tim Holtz - Blending Tool
- Double sided tape & Glue Stick
- Tape
- Sewing Machine / or You can hand stitch
- Scalpel & cutting Matt


First lay out the canvas sheets in the order You like, I have done them off centre. Once you have decided where you would like them we can start sticking.


I have used Orange Washi Tape to show you how I have attached the canvas sheets together, firstly start by attaching each pair together with a piece of tape.


Next I taped the 4 canvas sheets together.


You can see here how I have attached the tape like little tabs to attach the next canvas sheets on.


and continue until they are all stuck together.


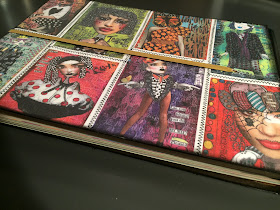
Here's what the front will look like once they are all attached


And here is what the back looks like! Don't worry if it looks messy, this will be stuck to the front of your journal cover. I have attached them together to make it easier for sewing on the sewing machine.


Next I have used a zigzag stitch to stitch the canvas sheets together, I found it easier to stitch the longer sides first.


Once I had stitched the longer sides I then went in & stitched the 4 smaller sections together.


Here is the front all stitched together


Here is the back of the canvas sheets all stitched together. As You can see I have stitched straight over the orange Washi tape. Remember this side will be stuck down to the journal.


Before I attached the canvas sheets to the journal cover I painted the spine & inside using Dylusions Black Marble Paint & blending tool.
Next I have stuck the Canvas sheets to the journal cover using double sided tape & glue stick. 


Next I trimmed around the canvas sheets using a scalpel & cutting matt to get a neat finish.


Then I shaded around the journal cover using Black Marble paint & blending tool.


To fit the elastic around the canvas sheets perfectly I cut a slit through the canvas and stuck it around the elastic... If you look very very closely you can just see the cut.


And here is the finished piece, I have used the same canvas sheets for the front & back cover but I have changed the positions of the canvases.


Here is a flip Journal decorated exactly the same however the canvas sheets are portrait instead of horizontal 


As you can see on this one we have stitched around the edges too


I hope you like them,

Love Jay


Friday, February 10, 2017

Valentines Card, Gift Wrap & Ribbon Step-by-Step


With Valentines Day just around the corner We have put together a Love themed Dylusions Step-by-Step for you, consisting of a Card, Gift Wrap and Matching ribbon.


Please Note: You can make the same projects using any colours and stencils of your choice, however I will just talk you through the Step-by-Step in the ones I used. 
To start with You will need;
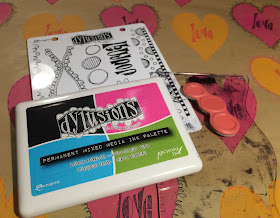
 Dylusions Paints, Bubblegum Pink and Squeezed Orange
 Tim Holtz Blending tool
Dylusions Stencil - Suits 9x12 
Brown Paper - This can be parcel wrap or gift wrap, the one I have used was just from a local supermaket 


To starts unroll the Gift Wrap to the size you would like to decorate. Taking the Heart stencil from the Dylusions - Suits Stencil pack, Using the Bubblegum Pink paint & blending tool paint the heart leaving enough space to add the orange heart in-between.
As You can see I have positioned my hearts slightly off centre.


Then using the Dylusions Squeezed Orange Paint repeat the process filling in the gaps between the pink hearts.


Next You will need; 
- The 'Love' stamp is from Dylusions - Word Love Stamp Set or We also have the Dylusions 'love' stamp on an individual wood mounted stamp - Love Word


Take the Love Word Stamp, Stamp onto the pink hearts using the Black Marble ink and onto the orange hearts using the Bubblegum Pink ink.


Next using the Dylusions Black marble Paint Pen doodle around the Bubblegum Pink hearts


I have then doodled around the Squeezed Orange Hearts using the New Dylusions Postbox Red Paint Pen 


Here it is all doodled 


Next You will need;


Using the Bubblegum Pink Ink Pad stamp the circle in-between the hearts


And that is Your Valentines Gift Wrap complete!


Now We are onto the Ribbon, You will need the following;
Tim Holtz - Crinkle Ribbon
Dylusions Ink Sprays - Bubblgum Pink and Squeezed orange
Water Mister


Take your piece of ribbon & spritz all over with water. Then Using your Squeezed Orange Spray Ink, spray patches of Orange and then Bubblegum Pink.
Once Sprayed all over put to one side to dry, or You can speed up the drying process using a heat tool.


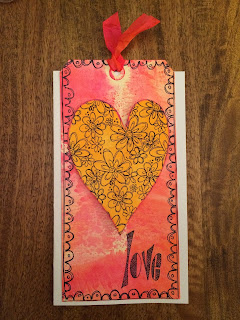
Take a Dylusions #10 Journal Tag - Mixed Media, using the left over spray from your ribbon mop it up using your tag and ou should get something similar to the above  (We don't like to waste anything!!) We are going to be using this for the Valentines card.


Next using the same technique as You did on the gift Wrap, Paint 2 Squeezed Orange Hearts and cut out. I have then edged the hearts using the bubblegum Pink & Blending tool.


Next using the Dylusions - Background Love Flower Stamp, Stamp it all over both of your orange hearts using the Black ink Pad.


Now Stamp the border stamp around your journal tag and Love word at the bottom in Black Ink. The border stamp is from the Dylusions - Anatomy of A Page Stamp Set


Next all you have to do is put it all together, Wrap you present and tie with your matching pretty ribbon. I have also used a piece of the ribbon in the journal tag hole before I stuck it onto the card.


I hope You have enjoyed our Valentines Blog & I'm sure your loved ones will love them!

Love Jay x