

Dylusions stamps...Bird on a wire, Further Around the Edge, Basic Backgrounds, Dependable Dotty, Pondering Petunia, Say what You Mean.
Manila card
Distress stains...Barn Door, Broken China, Mustard Seed, Crushed Olive, Peeled Paint, Dried Marmalade.
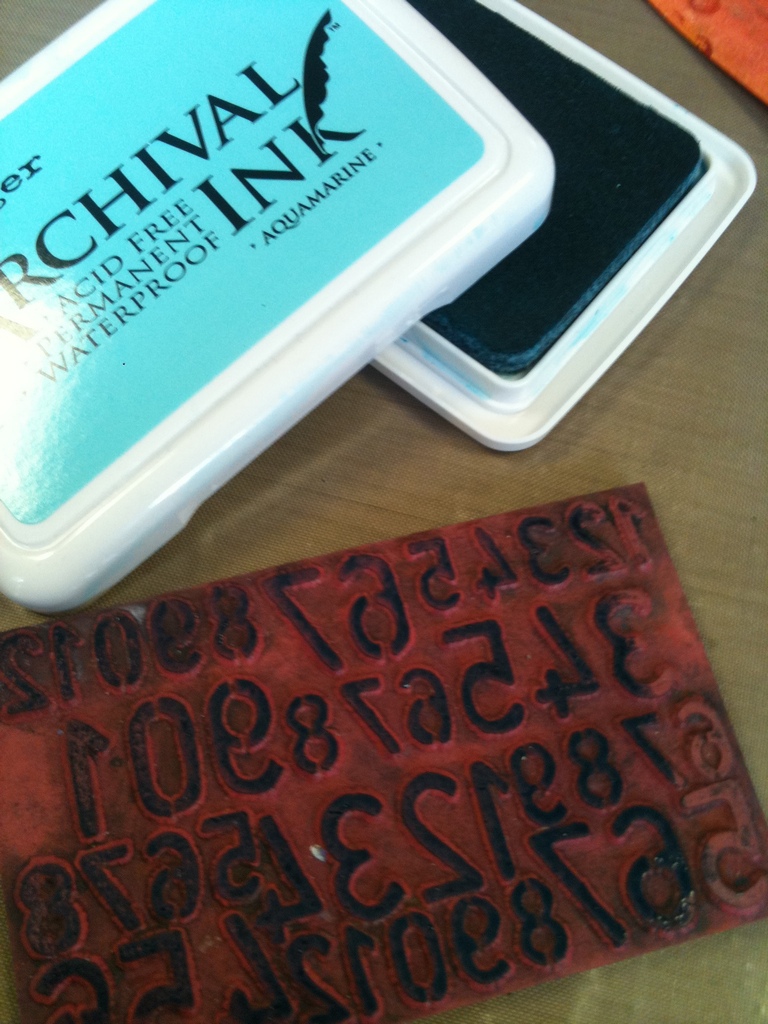
Archival inks...Venetian, Aquamarine, Vermillion, Jet Black
Perfect Pearl Mist...Sour Apple
Stormy Sky Distress Ink
Blending tool
Tim Holtz ruler ribbon
Tim Holtz tiny attacher
white Posca paint marker
Non stick Craft Sheet
Craft Scraper
white card
Method
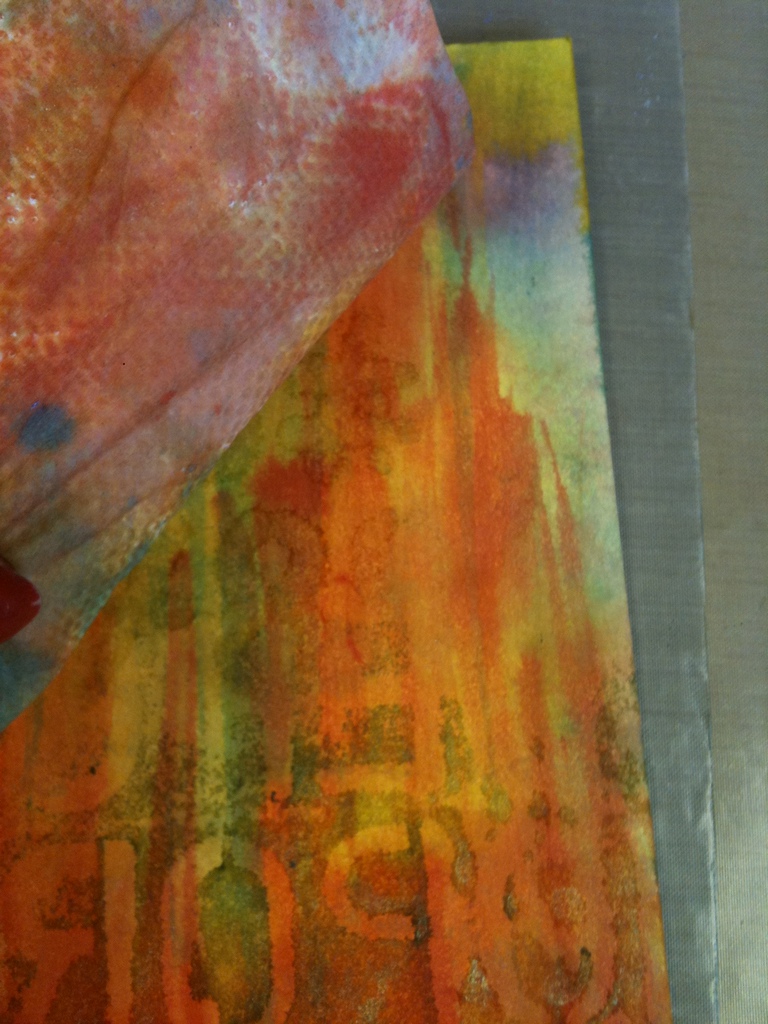
I started with 2 pieces of Manila card. frikkin love this stuff, it is my fave stuff to work on. My tag is extra large. These pieces are 6 x 81/4 in

When using the stains I always like to have spritzed the card with a little water first, as I prefer a blended effect. Always work on a Non Stick Craft Sheet.

The Distress stains are really fluid, concentrated dye ink, and so the colour doesn't dilute, but stays true. Press the bottle down onto the surface to release the ink,

Add the other colours. Don't worry about going over previous colours , the tops will clean.

Spritz over a little more water and tip the card up so that the inks blend into one another.

Take the 2nd piece of Manila and place over the first. Press down firmly to mop up all excess ink.

Both pieces of Manila will now be dyed.

Take kitchen roll and roll over the top to blot dry.

The non stick craft sheet will have the remains of any ink squeezed out.

Gently pick up a tag and press it into the ink. Dry with a heat gun and repeat as necessary, to build up the layers.

You can also add extra colour using your fingers to blend.

When everything is bone dry add a line of ink across one edge of the tag.

Immediately take a craft scraper and drag the ink down the tag.

Repeat at the opposite end with another colour.

Your tags should look something like this.

These are the colours I used in the background...Mustard Seed, Barn Door and Broken China.

Make sure everything is bone dry.

Take the Perfect Pearl Mist in Sour Apple and give it a really good shake to mix in the mica particles.

Spray lightly through a stencil.

Flip the stencil over and press to use up the excess ink, and form a reverse stencil.

At first you may not see much, as it is very subtle, but the shimmer will start to appear as it starts to dry.

Roll the kitchen roll over the tag to blot any excess.
The beauty of the Pearl Mists is that the colour is only from the mica particles and not from the solution. Most Mica sprays are suspended in a solution that is includes a dye ink. This will alter the colour of whatever you spray on. But with the Pearl Mists the background colour will always stay the same and just leave a shimmer.


Place both tags together and cut off a corner of both tags.

Turn one of the tags around and use the outline to shape the other side of the tag.

To add more layers I then used the new colours of Archival inks

and my Basic Backgrounds stamps.

Ink up the stamp a little unevenly

I designed these particular stamps not to be used with an acrylic block, just on their own. roll the stamp slightly and add to the tag.

This way you will get a slightly different image every time you stamp.

Add it to the tag randomly.

Repeat with the number stamp in a different colour ink.


Take the leaf border stamp

and ink with the Jet Black Archival ink

Stamp onto one of the tags.

Repeat as below

Take the border stamp and ink with Jet Black.

Stamp around the edge of the tag between the leaves. Stamp all around the edge of the other tag.

Stick both tags together with double sided tape. Take a black pen and draw a curved line at the top of the tag.

Take the birds from Bird on a Wire, and ink with Jet Black ink.

Stamp along the drawn line

Ink up the blending tool with Stormy Sky Distress ink

and apply to all the edges of the tag, front and back.

Stamp all the images as below, with black archival ink onto white card.

The Distress stains are fabulous for colouring in all your stamped images. Press each colour down lightly onto the non stick craft sheet to leave a little puddle of stain.

Add a puddle of water and wet your brush.

Dip into the puddle of stain and paint in your images.

I find it best to paint in everything in one colour before moving onto the next. This ensures that all the colours are dry and therefore won't bleed into each other.

Continue with all the other colours of Distress.

Colour in the leaves on the back of the tag.

Whilst the stain is still wet add a drop of the red onto the base of each leaf. Because they are still wet they will blend together beautifully.


These are the colours of Distress stains I used for painting the images.

Cut the images out and add them to the tag, as below.

Cut off approx 3in of the Ruler Ribbon.

and add to the top of the tag with the tiny attacher.

Add highlights to the top of each leaf with the white Posca paint marker.

This is the reverse of the tag.

and this is the front.

I hope this step by step has inspired you to have a go yourselves. If so please send me some photos of your tags,I would love to see them.
If you would like to own the actual tag from this step by step, then please leave me a comment on this post and I will draw a name at random. I have already signed it and will add your name at the top.
And on to Daily Outfit.
I have to say a big shout out to the gorgeous Anne Marie who has been so inspired by daily outfit, that she is transforming the way she dresses, and turned up for class today wearing a bright circle skirt that she had made herself. Way to go girlie, you looked frikkin gorgeous.
As I posed for today's pictures I didn't realise that I had little intruder with me.


Ha ha the little monkey.!!!
When I told her she had to pose for a picture for you all this was her reply, lol...!!!

Don't think she quite has the idea..!!!
Enjoy and don't forget to leave a comment if you want to be in with a chance of the tag. xx
Love the tag and thanks for the tutorial. Dianne.
ReplyDeletei'm gonna have to have a go at these techniques methinks!!
ReplyDeleteabsolutley dylicious!!
[just been looking at google maps as to how to get to your shop from brighton!! i really hope to get there some day!! - kaz says she'll take me!! lol!]
xx tonyR
I'm fairly new to all things inky and only have the distress inks and a few sprays (at the moment) but I've been so inspired to have a go, after seeing this tag tutorial. I love the bright vibrant colours, think a shopping spree is due!!
ReplyDelete(Your little monkey did make me laugh!)
Hi Dyan, thanks for your step by step tutorial.
ReplyDeleteI love your new outfits :)
Conny
Great tutorial and fantastic project. Fingers crossed I win:)
ReplyDeleteGreat tag, thanks for 'step by step'.
ReplyDeleteLol, photos are great!
Magda x
I didn't need these Distress Stains 'till I say your fabby tag. Thanks so much for sharing how it's made x
ReplyDeleteThank you for sharing the process, I love that you have designed the stamps for random fabulousness, thanks Jenny
ReplyDeleteOh my goodness Dy, you always make inky fun look so very beautiful :) now tell me, do I need a set of TH stains or Dylusions sprays first?? Torn!!
ReplyDeleteThanks for the tute! I really must get some stains :)
ReplyDeleteAlso....love that froggie! LOL
xoxo Sioux
Ohhh... I just love your tags!! Startet right away with some myself. Thanks for the tutorial and the stains are just magic to work with!!
ReplyDeletewhat a wonderful tutorial!!! i love the tag.. thanks for the chance to win.. i would frame it!!!
ReplyDeleteand i am loving the 'fit!!
big thanks for the step by step tutorial Dyan. Loved it, Loved it, Loved it! Have distress inks and alcohol inks so now have even bigger wish list and have to go shopping for new clothes now - Charity Shops here I come lol xxx
ReplyDeleteOooooooh, I need to try that! I just took delivery of the new distress stains from Art from the Heart yesterday but haven't played with them yet. I phoned your Ben to thank him as I only ordered them on Thursday afternoon and they were here at 9am on Friday - how good is that?!
ReplyDeleteLynn Wild
Love this tag Dyan! Thank you for the tutorial and the buckets of inspiration!
ReplyDeleteYvonne C xxx
love love to see this tutorial, very inspirational!
ReplyDeleteI have to put my hands on your stamps, definitely!
About your outfit, love black and white and the shoes are terrific!
Fantastic step by step, and i would love the chance to win it!
ReplyDeleteGreat outfit today, together with your little accessory!
Fab tag, great tutorial !
ReplyDeleteLove to get inky, love the tag! Thanks for the step by step, it's very helpful, hope your gonna do it again some time :-D xoxo
ReplyDeleteHi Dyan, love your tag, thank you for the chance of winning it. I will definitely be having a go! Love your outfit! Love S xx
ReplyDeleteGosh I really do need to be brave and just have a go at these techniques. I think it would be a good idea to start with a tags or even ATCs before taking the leap into art journalling. Your work is always so inspiring!!
ReplyDeleteFingers crossed that I'm lucky enough to win as to own a piece of your art would be an honour, and to study it up close would be a productive kick up the bum to have a go myself lol
Take care, Charli xx
nice to follow your steps in this tutorial! i just bought some of your stamps and will play with them asap.
ReplyDeleteHey gorgeous lady!
ReplyDeleteLove today's outfit, you are rocking the look big time.....love the little superstar model too she has some serious shapes going on...a natural!
Big hugs
Kazx
Great tutorial and yes, I'd love a chance to win the tag, it's gorgeous - I'm keeping me fingers crossed! ;)
ReplyDeleteLove your outfit!
Brilliant tutorial as always..been slowly stocking up on stains and inks...and I am loving the outfit today...it's really you!!!
ReplyDeleteEnjoy the weekend..
Kirsti xxx
Dyan thanks for the tutorial...I suppose the secret is not to be in a hyrry and to have some talent!!Love yout tag would love to own one!!! ps. thanks for fashion update too!!
ReplyDeleteLove the tag and great tutorial . Super pictures too enjoy the daily outfit ... what a little imp she is. xx
ReplyDeleteLove the tag and the tut is fantastic, will have a go when I get home. Am loving your daily outfits and Masie is looking good, a model in the making.
ReplyDeleteLove the tag and the tutorial is brill
ReplyDeleteHugs
Grace
xx
A great tutorial and tag, Dyan.Thanks for the explanation about the effect of the PP sprays too. Can't wait for the next workshop (but I'll have to)
ReplyDeleteJanex
I have to check your blog each and every day. It nearly always makes me smile. The tag idea is just great. Seeing your outfits each day has been great too, especially with the little one appearing today. I think she's a chip off the old block. Not quite so old block me thinks!!!!!!
ReplyDeleteThanks for the tutorial and am feeling re-inspired after having been in a lull - am running for my inks and stamps as i am writing this!
ReplyDeleteOh my That took some typing Dyan great work!!!!love the tag and what a trip to get a tag signed by you, luv Georginaxxx
ReplyDeleteWonderful tutorial and another great outfit. What a style guru you are turning into :o)
ReplyDeleteThanks for the step by step instructions - totally inspirational! Love your outfit too - and little sidekick - LOL.
ReplyDeleteLove your tag and would love to win it.
ReplyDeleteRocking tag, rocking outfit, rocking blog. Fab stuff as ever! :)
ReplyDeleteA fantastic tutorial - thanks alot and a wonderful tag, looks really fabulous.
ReplyDeleteLove the tag, love the tutorial but just adore your shoes today.
ReplyDeleteThe tag is completely fab, thanks for the tutorial. I'm going to have to give in & get some Distress Stains, aren't I? Love the photos, you look bee-yoo-ti-ful.
ReplyDeleteFabulous tag! She is so funny under your skirt
ReplyDeleteI'm definately going to have a go -fabulous inspiration and tutorial x
ReplyDeleteWonderful tag, I love the colours so much. I wish I could learn to line things up like you do, my birds would have missed your line by miles!
ReplyDeletewow... loving the tag. thanks for taking the time to do the tutorial. perhaps you should do a "monkey" tag!!!!! looking gorgeous as always. xxxx
ReplyDeleteThank you for showing us how this is a brilliant tutorial.I will have a go :0)
ReplyDeleteThanks Dy for some new hints and tips to add to the ever increasing wealth of knowledge you are giving us!! You look fab as always!!
ReplyDeleteGreat post - I love the tag!
ReplyDeleteFabulous tag - yes please! Michelle x
ReplyDeleteFab tag and wonderful giveaway
ReplyDeleteI would love to win this tag - it is great!!! Love the techniques you used and can't wait to try this. Just got my first set of your stamps from my local store in Nashville, IN - USA and itching to try them out. Thanks for the opportunity to win.
ReplyDeleteThanks for the step by step. It is great to see how you achieve the depth of colours for your backgrounds.
ReplyDeleteLoved the pictures with your new model, lol.
From one Garth Brooks fan to another: It's a fab tag Dyan, just found your blog! Sam x
ReplyDeleteGreat tutorial Dyan, thanks!
ReplyDeleteYour new outfits are great!
Great tutorial Dyan, thanks!
ReplyDeleteLoving the outfits too!
Terrific tutorial! Yes,I'm going to try the tag. Just received my first set of Dylusions sprays here in Seattle and I'm delighted. I can't wait to order the new colors.
ReplyDeleteGoes without saying that I'd be over the moon if I won your tag.
Happy vintage shopping.
Marjan
My goodness!!! Thank you so much for your amazing generosity :) Even though we may never meet in this lifetime...I Luv ya bunches!!
ReplyDeleteHave a blessed day!
Despite Maisies efforts to show us her attitude to fashion[go maisie, never take it seriously ], you still steal the show with style. Love the tutorial.
ReplyDeleteHave been in love with Travelling Travis for some time, so at last picked him up at Ally Pally and he's mine, all mine. So maybe he will have to be on my version of your tag.x
Thanks for the tutorial.
ReplyDeleteI love your tags.
:)
Thanks so much for this clear tutorial - I love seeing how you create all those layers of colour - and yes, it makes me want to play with all my messy supplies today!
ReplyDeleteThanks for the step by step,
ReplyDeleteWOW here were so many great pictures there, I now have better understanding of all the layers & stash that goes into making a dyan
master piece,
I would love to win the tag,
It would go pride of place in my craft room.
have a creative day,
Kat.
Dyan,
ReplyDeleteI am so glad that I took your class at the Queen's Ink in Maryland, USA. I absolutely love your techniques.
Love your tag Dyan but love your skirt more!
ReplyDeleteWow, thanks for all the details! I love the backgrounds and your stamps!
ReplyDeletethanks for the detailed tutorial :) great tag, i need to get more stains! they are awesome. Loving the skirt!
ReplyDeleteFabulous step by step, thank you! I feel utterly inspired to have a go myself! More tutes please!
ReplyDeleteI love the stamps!!! And the techniques you showed and used were wonderful!
ReplyDeleteLove that tag, Dyan, and thank you for the instructions. Helga
ReplyDeleteI love step-by-steps and seeing the process of others, thanks for sharing.
ReplyDeleteThe tag has so many details, this is amazing !
Fabulous tutorial. Thanks for stepping it out for us.
ReplyDeleteYour intruder is adorable.
BTW, I love your shoes!
thanks for sharing it. Love the way it works and oyur tutorial.
ReplyDeleteGreetings from Holland.
love this post had lost my way ( had a creative block) now all I want to do is play thanks for the inspiration and thanks for sharing
ReplyDeleteFANTASTIC tutorial! I LOVE your work and the process is amazing.
ReplyDeleteTFS!
~Linda
LOVE those drips - you make it look SO easy! AND I need more stamps now, he, he, he!! Great tutorial. Thanks x
ReplyDeleteFABULOUS tag!
ReplyDeleteI love distress stains. Thanks for the tutorial.
Ooh thanks for the fab step by step! I must have a play with these techniques. :D
ReplyDeleteDyan, Absolutely love the tute and tag! I'm hooked big time on your stamps now and love your tips!
ReplyDeleteDeb M
lol this is quite impressive!! Love it!
ReplyDeleteThank you Dy, I also spent Sat, Sun & today in dresses - ran out of them now so back to the trousers tomorrow ! Lol, love the step by step, think I understand the inks a little more now xxx
ReplyDeleteI am slowly gathering the supplies I (think I!) need to start art journalling and your work has definitely inspired me to attempt to start. This tutorial is great as it is broken down into step by step instructions. Brilliant - thank you!
ReplyDeleteWhat a fab tag. I am in a mini book tag swap and I will have a go at trying to replicate this.
ReplyDeleteThanks so much for the tutorial and the chance to own this beautiful piece of art
Fantastic tag and great step by step!
ReplyDeleteJust fabulous as always-love it when you do a step by step! It all seems so simple then!
ReplyDeleteFabulous as usual-love it when you do a step by step-makes it seem so simple then..
ReplyDeletealso love seeing your vintage wear. reminds me so much of myself in my teens & 20's (alas a long long time ago) it's all I used to wear! you rock the look!
great tutorial, thanks, might have to get some distress stains :) and some of your lovely stamps xx
ReplyDeleteHope you haven't drawn yet! I love your stuff and I would so love to get this tag!
ReplyDeleteOMG Hope it's not to late to win! I love love your stuff! And am waiting with baited breath for my stamps as well! I would so love to have that tag!
ReplyDeleteA great tutorial Dianne! It has given me heaps to think about and to have a go at. I love all the bright colours too.
ReplyDeleteDot x
You make fantastic things. I really adore your work. Thanks for the tutorial.
ReplyDeleteFANTASTIC inspiration!!!! :D
ReplyDeleteHi Dyan I know you're in the U S of A but I had to post this while it's in my head. Just read through your tutorial and I love your tags I'm trying, very trying, lol to make some similar for my craft table in 2 weeks. Will have a go and let you know how I get on. Have a great time. Jean xx
ReplyDeleteLove it
ReplyDeleteSimply wonderful
ReplyDeleteLove the tag and thanks for the tutorial. Great pics of you both.
ReplyDeleteHugs LINDA